Bake Perfect Pumpkin Pie: Foolproof Tips for No Cracks & Flaky Crust
Few desserts evoke the warmth and nostalgia of autumn quite like a perfectly baked pumpkin pie. It's the undisputed star of Thanksgiving tables, a comforting classic that signifies the arrival of cozy fall flavors. But achieving that idyllic slice – one with a delicate, flaky crust and a smooth, creamy filling devoid of any unsightly cracks – can sometimes feel like a daunting task. Fear not, home bakers! This comprehensive guide will equip you with all the foolproof tips and tricks you need to bake a pumpkin pie that's not only delicious but absolutely picture-perfect, every single time. Get ready to impress your family and friends with a dessert that embodies the ultimate blend of comfort and tradition.The Foundation: Crafting the Flaky, Buttery Crust
A truly great pumpkin pie begins with an exceptional crust. Forget soggy bottoms or crumbly edges; we're aiming for golden-brown perfection that shatters delicately with each forkful. The secret to an irresistibly flaky crust lies in just a few key principles:- Cold Ingredients, Minimal Handling: The colder your butter and water, the flakier your crust will be. Cold butter creates pockets of steam in the oven, leading to those coveted layers. Work quickly and efficiently to prevent the butter from melting.
- Perfect Dough Consistency: Don't overwork your dough! Over-mixing develops gluten, resulting in a tough crust. Mix until just combined, then chill the dough thoroughly before rolling.
- No Blind Baking Needed: This might come as a surprise to some, but for pumpkin pie, you typically don't need to blind bake the crust. The high moisture content of the custard filling helps to cook the raw dough from the bottom up, preventing sogginess. When the pie is baked at the correct temperatures, the crust and the filling will cook simultaneously, resulting in a perfectly integrated texture.
- Chill Your Crust: Whether you're making your own dough or using a store-bought option, ensure your pie shell is well-chilled, or even frozen, before pouring in the filling. This helps the crust hold its shape and contributes to that beautiful flakiness.
- Mind the Edges: Crimp your pie crust edges decoratively – not only does it look appealing, but it also helps contain the filling and prevent any spills during baking.
The Heart of the Pie: A Rich, Crack-Free Pumpkin Filling
The filling is where the magic truly happens, transforming simple ingredients into a velvety, aromatic custard. Achieving that smooth, unblemished surface is crucial for a professional-looking pie.Choosing Your Pumpkin Purée: Canned vs. Roasted
When it comes to the pumpkin itself, you have a choice: convenient canned purée or homemade from scratch. Each has its merits:
- Canned Pumpkin Purée: Offers consistent results and undeniable convenience. It's a reliable choice for a delicious pie.
- Homemade Pumpkin Purée: For a truly deep, nuanced flavor that sets your pie apart, consider making your own purée from a sugar pumpkin (also known as a pie pumpkin), or other flavorful winter squash like kabocha or butternut. Roasting the pumpkin caramelizes its natural sugars, intensifying the flavor profile significantly. An informal taste test often reveals that adults particularly prefer the richer, more complex taste of pies made with roasted pumpkin.
To make your own purée, simply halve a sugar pumpkin, scoop out the seeds (which you can roast for a snack!), and place the halves cut-side down on a baking sheet lined with parchment or foil. Roast at 350°F (175°C) for 1 to 1.5 hours, or until fork-tender. Once cooled, scoop out the pulp and blend until smooth. For an extra silky texture, press it through a food mill or chinois. Want to dive deeper into this choice? Explore the nuances in our related article: Homemade Pumpkin Pie: Canned vs. Roasted Purée for Best Flavor.
The Art of the Spice Blend
When people refer to "pumpkin spice," they're really talking about the warm, fragrant blend of spices found in a classic pumpkin pie. The core components are:
- Cinnamon: The dominant and comforting note.
- Ground Ginger: Adds a zesty warmth and subtle bite.
- Nutmeg: A sweet, earthy, and aromatic counterpoint.
- Cloves and/or Allspice: These two share similar flavor profiles, so typically you'll use one or the other for a deep, pungent warmth.
For an elevated, sparkling dimension, consider adding a tiny dash of ground cardamom. Even an eighth of a teaspoon can introduce a subtle, sophisticated brightness that truly enhances the overall flavor without overpowering it. The key is balance – enough spice to be aromatic and flavorful, but not so much that it tastes like potpourri. Learn more about perfecting your spice blend in our guide: Making Homemade Pumpkin Pie: Guide to Rich Flavor & Perfect Spices.
Crafting the Custard: Preventing Cracks
The velvety texture of pumpkin pie comes from a rich custard base, typically made with eggs, sugar, and dairy like half-and-half or heavy cream. To ensure a crack-free surface, follow these essential tips:
- Don't Overmix: While you want to combine all ingredients thoroughly, avoid over-whisking the filling. Introducing too much air can cause the custard to puff up in the oven and then collapse, leading to cracks. Mix until just smooth.
- Room Temperature Ingredients: Using room temperature eggs and dairy helps them emulsify more smoothly with the pumpkin purée, creating a more uniform and stable custard.
- Proper Baking Temperature: This is arguably the most critical factor in preventing cracks. An uneven or too-high temperature can cause the outer edges of the pie to set and dry out faster than the center, creating tension that results in cracks.
Baking to Perfection: Temperature Control & Tell-Tale Signs
The baking process for pumpkin pie is a delicate balance, and temperature management is key to achieving that smooth, tender custard and perfectly cooked crust.- The Two-Stage Bake: Many recipes, including classic ones, call for starting your pumpkin pie at a higher temperature (e.g., 425°F or 220°C) for the first 10-15 minutes, then reducing the oven temperature (e.g., to 350°F or 175°C) for the remainder of the baking time.
- The initial high heat helps to rapidly set the crust, preventing it from becoming soggy, and gives the pie a quick lift.
- Reducing the temperature allows the custard to cook gently and evenly throughout, reducing the risk of overbaking the edges and causing cracks. This gradual cooking process ensures a uniform texture from edge to center.
- The "Wobble" Test: Knowing when your pumpkin pie is done is crucial. You're looking for the edges to be set and firm, while the very center (about a 1-2 inch circle) should still have a slight, delicate jiggle when gently nudged. It should not be sloshy or liquid. The residual heat will continue to cook the center as it cools, bringing it to perfect doneness. Overbaking is a primary culprit for cracks and a dry texture.
- Protect Your Crust: If your pie crust edges are browning too quickly, loosely tent them with aluminum foil or use a pie crust shield to prevent scorching.
Overall baking time for a standard 9-inch pumpkin pie is usually around 50-70 minutes, but always rely on the wobble test rather than strict timing, as oven temperatures can vary.
Beyond the Oven: Cooling, Slicing & Serving
The journey to a perfect pumpkin pie doesn't end when it leaves the oven. How you handle it afterwards is just as important for its final presentation and texture.- Gradual Cooling is Key: Resist the urge to rush your pie from the hot oven to a cold countertop or, worse, the refrigerator. Sudden temperature changes can shock the delicate custard, leading to cracks. Instead, transfer the pie to a wire rack and allow it to cool completely at room temperature for several hours (at least 2-4 hours, or even overnight) before slicing or refrigerating. This allows the custard to fully set and firm up.
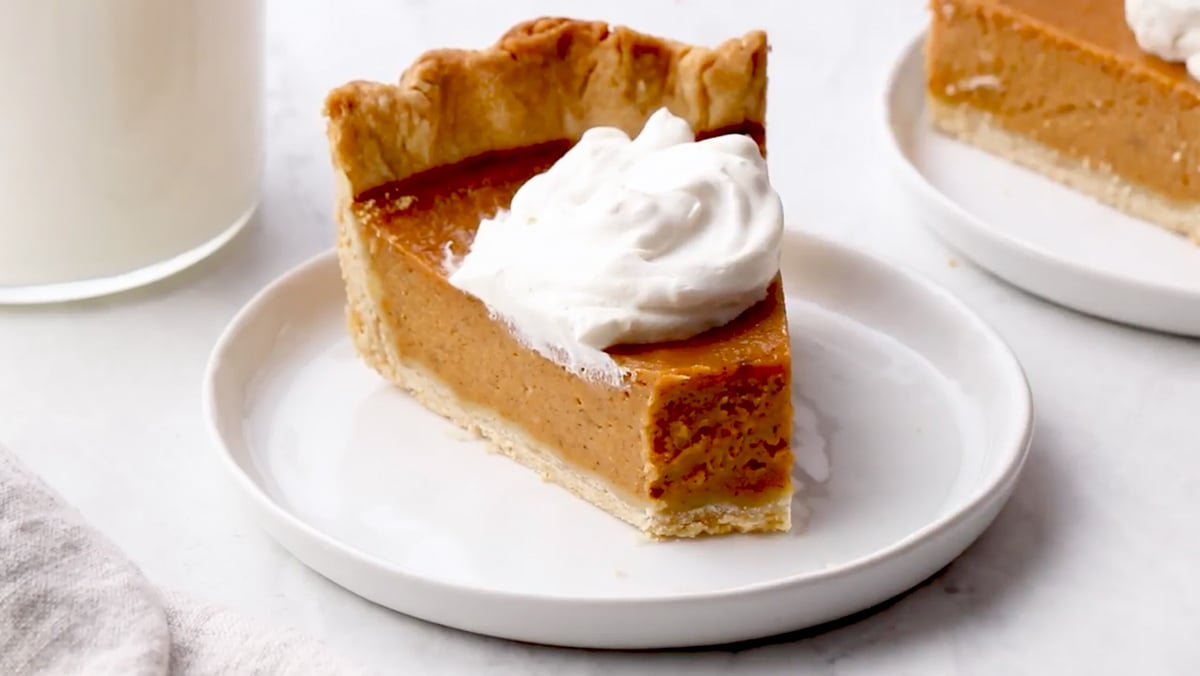
- The Perfect Slice: Once fully cooled, a sharp, clean knife is your best friend for neat slices. You can even run the knife under hot water and wipe it clean between cuts for extra precision.
- Classic Toppings: A dollop of sweetened whipped cream is the quintessential topping for pumpkin pie, adding a cloud-like lightness and balancing the rich filling. For an extra touch, dust with a sprinkle of cinnamon, nutmeg, or even cocoa powder.
- Storage: Pumpkin pie should be stored in the refrigerator once it has fully cooled, where it will keep well for 3-4 days.
